Changing the default RDP port is a simple but effective security measure, especially for those managing critical systems or remote infrastructure. Whether you’re running a physical server or a virtual private server, having full administrative access allows you to customize security settings like the RDP port with complete flexibility.
For instance, on our bare metal servers or our VPS, you have unrestricted control to change default ports, configure custom firewall rules, and tailor security settings to your needs.
How to Change the RDP Port on Windows Server and Secure Remote Access
Changing the default RDP (Remote Desktop Protocol) port from 3389 to a custom port is a simple but effective way to improve server security. This tutorial walks you through how to do it safely, including how to open the new port on the firewall and disable the default one after testing.
✅ Requirements
- Administrator access to your Windows Server
- Remote Desktop already enabled
- Access to Windows Firewall
- Console access (KVM, IPMI, iDRAC, etc.) is highly recommended
1. Open the Registry Editor
Press Win + R, type regedit, and press Enter.
Navigate to:
HKEY_LOCAL_MACHINE\System\CurrentControlSet\Control\Terminal Server\WinStations\RDP-Tcp
2. Modify the RDP port
- On the right side, find PortNumber
- Double-click it
- Choose Decimal
- Change the value from 3389 to your new custom port (Example: 49288)
- Click OK to save

3. Create a new firewall rule for the custom port
Open Windows Defender Firewall with Advanced Security.
- Click on Inbound Rules
- On the right side, click New Rule…
- Select Port, click Next
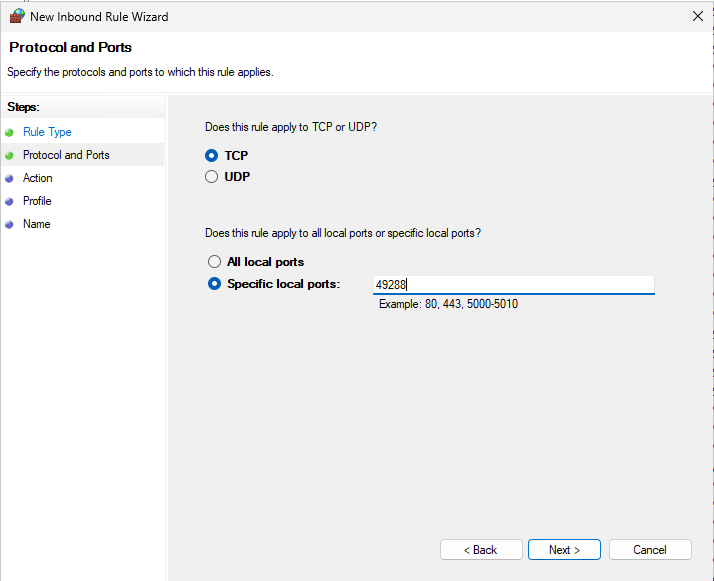
- Choose TCP, and enter your new port (e.g., 49288)
- Select Allow the connection, click Next
- Choose the profiles where it applies (Domain, Private, Public)
- Name the rule (e.g., Custom RDP Port 49288)
- Click Finish

4. Restart the server and Test the new RDP connection
After creating the new firewall rule and changing the port in the registry, restart your server to apply the changes.
Once the server is back online, test the Remote Desktop connection using the new port from your computer
YOUR_SERVER_IP:49288
6. Disable the old RDP rule for port 3389
Once the new port is working, return to Windows Defender Firewall with Advanced Security, find the rule named:
Remote Desktop – User Mode (TCP-In)
Right-click it → Disable Rule
This will stop the system from listening on port 3389, reducing attack surface.

